The Cuboctahedron
The cuboctahedron puzzle is an archimedean solid with 14 faces; 8 triangular faces and 6 square faces. It is composed of 14 center pieces (8 triangular and 6 square), 12 vertex pieces and 24 edge pieces.

Each of the vertex pieces has four sides, two from a triangular face and two from a square face. Since the triangular side of a piece can only be repositioned to a triangular face and the square side can only be repositioned to a square face, each vertex piece has two different possible orientations (shown below). Each of the edge pieces has two sides, one from a triangular face and one from a square face. For the same reasoning as with the vertex pieces, each edge piece has only one possible orientation. (Note that the shape of the vertex pieces in the diagram below have been simplified)

There are 12! ways to reposition all of the vertex pieces and another 2 ways to orient each of them resulting in a total of 12!*212 ways to configure all of the vertex pieces. There are also 24! ways to reposition all of the edge pieces. Since the center pieces do not move and each have only one orientation there is only one way to position them. Combining these totals result in an upper bound of 12! * 212 * 24! different configurations of the cuboctahedron puzzle. Based on this information, the group C ={S12 * ℤ212 * S24} will be used to represent all of the possible configurations of the puzzle. Here, S12 and S24 are the permutation groups of the vertex and edge pieces while ℤ212 is the vector specifying the orientation of the vertex pieces.
As with the Rubik’s cube and octahedron puzzle, the cuboctahedron puzzle referred to in this paper is one that can only be reconfigured by rotating its faces. To create this puzzle, the cuboctahedron would have to be sliced with planes parallel to each face. Doing this would result in 48 extra pseudo-center pieces which could move and separate from the vertex pieces. A physical puzzle must include these pieces for the faces to turn. This would add a factor of S48 as well as additional conditions for elements of the group C. For simplicity, this paper considers an abstract puzzle with only vertex and edge pieces. To physically permute these pieces, they will have to be lifted off of the puzzle and placed back correctly.
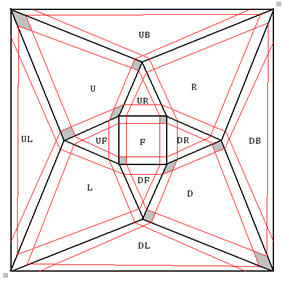
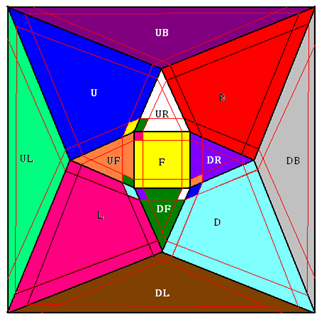
For further work with the cuboctahedron puzzle, it is useful to name the faces. The 6 square faces of the cuboctahedron will be referred to as the front (F), right (R), left (L), up (U), down (D), and back (B). The 8 triangular faces will be referred to as the upper front (UF), upper right (UR), upper left (UL), upper back (UB), down front (DF), down right (DR), down left (DL), and down back (DB) as shown below.
As with the Rubik’s cube and octahedron puzzle, the cuboctahedron puzzle referred to in this paper is one that can only be reconfigured by rotating its faces. To create this puzzle, the cuboctahedron would have to be sliced with planes parallel to each face. Doing this would result in 48 extra pseudo-center pieces which could move and separate from the vertex pieces. A physical puzzle must include these pieces for the faces to turn. This would add a factor of S48 as well as additional conditions for elements of the group C. For simplicity, this paper considers an abstract puzzle with only vertex and edge pieces. To physically permute these pieces, they will have to be lifted off of the puzzle and placed back correctly.
For further work with the cuboctahedron puzzle, it is useful to name the faces. The 6 square faces of the cuboctahedron will be referred to as the front (F), right (R), left (L), up (U), down (D), and back (B). The 8 triangular faces will be referred to as the upper front (UF), upper right (UR), upper left (UL), upper back (UB), down front (DF), down right (DR), down left (DL), and down back (DB) as shown below.

|

|
The vertex and edge pieces will also be labeled as shown in the graphs below.


Each vertex piece will have an orientation of either 0 or 1 (ℤ2). For purposes of this paper, the defined zero sides for vertex pieces are shaded in the graph below. The square side that is not defined as the zero side will by default have an orientation of 1. (As explained earlier, even though there are 4 sides to the vertex pieces, they each have only two ways to be oriented. In the graph below, the square sides not shaded will have an orientation of 1 even though they are technically two faces away from the zero side.)
As mentioned above, the group C formed by the cuboctahedron puzzle is a subset of S12 * ℤ212 * S24. Similar to the Rubik’s cube and octahedron puzzle, an element of this group will have the form X = (α, a, β) where α is the permutation of the vertex pieces, a is the orientation vector of the vertex pieces and β is the permutation of the edge pieces. (Note: Like the octahedron, the cuboctahedron will disregard b since the edge pieces can never be incorrectly oriented) The orientation vectors for the vertex pieces will have the form a = (a1, a2,… a12), where an refers to the orientation of the vertex piece currently occupying position n.
Here is a simple example to demonstrate how to find a configuration’s corresponding element in the group C. Suppose the only three pieces that are out of place are the vertex pieces indicated on the front face in the picture below; all the other pieces are correctly positioned and oriented.
Here is a simple example to demonstrate how to find a configuration’s corresponding element in the group C. Suppose the only three pieces that are out of place are the vertex pieces indicated on the front face in the picture below; all the other pieces are correctly positioned and oriented.
The first step is to look at the permutation of the vertex pieces. Piece 1 is now in the position of piece 3, piece 3 is located in position 4 and piece 4 is located in position 1. Since all of the other vertex pieces are in the correct position the resulting vertex permutation is α =(1 3 4). For the orientation vector, we must recall which faces have an orientation of zero. In position 1, the zero side of this piece is correctly placed on the upper face resulting in an orientation of 0. In position 3, the zero side belongs on the down face but is on the front face. The actual zero side is 1 square face away clockwise from the defined zero side resulting in an orientation of 1. In position 4, the zero side belongs on the front face but is on the left face. Again, the actual zero side is just one face away from the defined zero side resulting in an orientation of 1. The remaining pieces all have an orientation of 0 since they are correctly oriented. The resulting vector is a = (0,0,1,1,0,0,0,0,0,0,0,0). If any edge pieces were out of place, the same process would be used to determine their correct permutation and orientation vector. The element in C for this example is
A = ((1 3 4), (0,0,1,1,0,0,0,0,0,0,0,0), (1))
The basic moves that the cuboctahedron puzzle group is composed of are {F90, R90, L90, U90, D90, B90, UF120, UR120, UL120, UB120, DF120, DR120, DL120, DB120}. These stand for, respectively, rotating the front face, the right face, the left face, etc. 90 degrees clockwise, and the upper front face, the upper right face, the upper left face, etc. 120 degrees clockwise. These moves will be referred to as the generators of the group because any configuration of the cuboctahedron can be attained from combining them. Their corresponding elements in the group are as follows.
The basic moves that the cuboctahedron puzzle group is composed of are {F90, R90, L90, U90, D90, B90, UF120, UR120, UL120, UB120, DF120, DR120, DL120, DB120}. These stand for, respectively, rotating the front face, the right face, the left face, etc. 90 degrees clockwise, and the upper front face, the upper right face, the upper left face, etc. 120 degrees clockwise. These moves will be referred to as the generators of the group because any configuration of the cuboctahedron can be attained from combining them. Their corresponding elements in the group are as follows.

F90 = ((1 2 3 4), (1,1,1,1,0,0,0,0,0,0,0,0), (1 2 3 4))
R90 = ((2 5 12 6), (0,0,0,0,0,0,0,0,0,0,0,0), (5 6 7 8))
L90 = ((4 7 10 8), (0,0,0,0,0,0,0,0,0,0,0,0),(13 14 15 16))
U90 = ((1 8 9 5), (0,0,0,0,0,0,0,0,0,0,0,0), (17 18 19 20))
D90 = ((3 6 11 7), (0,0,0,0,0,0,0,0,0,0,0,0), (21 22 23 24))
B90 = ((9 10 11 12), (0,0,0,0,0,0,0,0,1,1,1,1), (9 10 11 12))
UF120 = ((1 4 8), (1,0,0,0,0,0,0,1,0,0,0,0), (4 14 20))
UR120 = ((1 5 2), (0,1,0,0,1,0,0,0,0,0,0,0), (1 19 5))
UL120 = ((8 10 9), (0,0,0,0,0,0,0,1,0,1,0,0),(10 17 13))
UB120 = ((5 9 12), (0,0,0,0,1,0,0,0,1,0,0,0), (6 18 9))
DF120 = ((3 7 4), (0,0,0,1,0,0,1,0,0,0,0,0), (3 24 15))
DR120 = ((2 6 3), (0,0,1,0,0,1,0,0,0,0,0,0), (2 8 21))
DL120 = ((10 7 11), (0,0,0,0,0,0,1,0,0,0,1,0), (11 16 23))
DB120 = ((6 12 11), (0,0,0,0,0,1,0,0,0,0,0,1), (7 12 22))
or the cuboctahedron, the combination of any two moves, X = (α, a, β) and Y = (δ, d, ε), gives the result X ∙ Y = (αδ, a + αd, βε). An example comparing the results from combining two moves by inspecting the diagram and by using the group operation is provided below. Similar to the Rubik’s cube and octahedron puzzle, the two answers should agree. Here, the two moves that will be combined are first rotating the front face 90 degrees clockwise and then the down right face 120 degrees clockwise.

The element for this configuration of the puzzle can be found using the same method used previously. First, the vertex permutation and orientation vector should be found by inspecting the graph; then the resulting edge permutation and orientation vector. The element in the group O that these moves produce is
DR120∙F90 = ((1 6 3 4), (1,1,1,1,0,0,0,0,0,0,0,0), (1 8 21 2 3 4))
Using the group operation to combine these moves is shown below.
F90 = (δ, d, ε) = ((1 2 3 4), (1,1,1,1,0,0,0,0,0,0,0,0), (1 2 3 4))
DR120 = (α, a, β) = ((2 6 3), (0,0,1,0,0,1,0,0,0,0,0,0), (2 8 21))
DR120∙F90 = (αδ, a + αd, βε)
= ((1 6 3 4), (0,0,1,0,0,1,0,0,0,0,0,0) + (2 6 3) ∙ (1,1,1,1,0,0,0,0,0,0,0,0), (1 8 21 2 3 4))
= ((1 6 3 4), (0,0,1,0,0,1,0,0,0,0,0,0) + (1,1,0,1,0,1,0,0,0,0,0,0), (1 8 21 2 3 4))
= ((1 6 3 4), (1,1,1,1,0,0,0,0,0,0,0,0), (1 8 21 2 3 4))
Again, the combination of these moves results in the same answer regardless of the method used.
